Getting Started with Gpg4win and Outlook
Posted on February 28, 2020 by Heike Jurzik
Encrypting and signing emails isn't rocket science, and you don't have to be a Linux pro to do it. With Gpg4win and Outlook, you can easily send and receive encrypted and digitally signed emails on Windows. This guide walks you through the process of setting up GnuPG in Outlook with an easy-to-use add-in—so you can secure your emails in just a few minutes.
Why Does This Matter? Email encryption and digital signatures help protect you from attackers:
- Encryption ensures that only the intended recipient can read your emails. It prevents unauthorized access, keeping your communication confidential.
- Digital signatures protect your emails from being altered or forged. Attackers might still send fake emails in your name, but without your private key, they can't sign them—making their forgeries easy to spot.
Installing Gpg4win: Set Up Email Encryption with GnuPG in Outlook
If you use Outlook on Windows, Gpg4win
is the fastest and easiest way to add GnuPG encryption and digital
signatures to your emails. Just head over to the website and click the
green Download Gpg4win button to get started. Once the installation
file (gpg4win-<version>.exe) is downloaded, run it and, as with most
Windows applications, confirm that you allow the app to make changes to
your system.
The installer supports multiple languages—choose English (or your preferred language) and click OK. Then, after clicking Next, you'll see a list of Gpg4win components you can install:
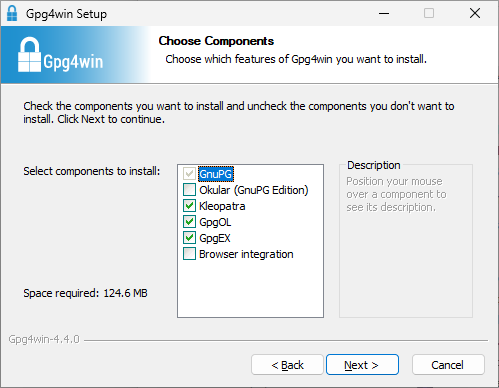
Figure 1: Selecting Gpg4win Components
- GnuPG: The core component responsible for asymmetric encryption and digital signatures—this cannot be deselected.
- Okular (GnuPG Edition): A modified and hardened version of the Okular PDF viewer.
- Kleopatra: A user-friendly key and certificate manager, which we'll cover in more detail later in this guide.
- GpgOL: The Outlook add-in that integrates GnuPG into Outlook, allowing you to encrypt and sign your emails directly.
- GpgEX: A Windows Explorer extension that lets you encrypt files via the right-click context menu.
- Browser integration: Enables the use of GnuPG with webmail services like GMX, Posteo, or Telekom.
Since this guide focuses on Outlook, we recommend keeping the default selections. You can also safely accept the default installation folder.
Generating a Key Pair: OpenPGP for Email Encryption in Gpg4win and Outlook
Let's skip the deep dive into the theory of asymmetric cryptography for now. The key thing to know: No keys, no encryption. To use GnuPG, you need a key pair—a private key and a public key. You can create your key pair directly in Kleopatra, the graphical key management tool included with Gpg4win. After installing Gpg4win, Kleopatra will launch automatically. You'll see a welcome screen along with a New Key Pair button. Click it to get started.
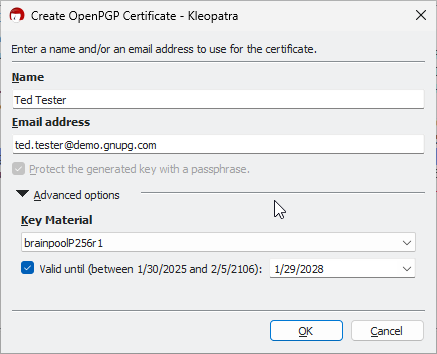
Figure 2: Generating a new Key Pair
Select Create a personal OpenPGP key pair, then enter your name and email address.
Important: The email address you enter must match the one you use in Outlook as your sender address. This ensures that Outlook correctly associates your key with your outgoing emails.
It's worth checking out the Advanced options before finalizing your key pair. By default, Kleopatra generates a key that is valid for three years. This is a security measure—if you ever lose your key, it won't remain valid indefinitely. As long as you still have your private key, you can extend its validity at any time. If you prefer a shorter or longer expiration period, you can adjust it under Valid until (for example, setting it to expire one year from today). Leave the other advanced settings as they are, then click OK, followed by Next, and finally Create in the next dialog.
Next, you'll be asked to enter a passphrase twice. This password protects your private key and ensures that only you can use it. Choose a passphrase that's secure but easy to remember. After entering it twice, Kleopatra will generate your key pair. Click Finish to complete the process.
Tip: If you already created a key pair on another computer—maybe even on macOS or Linux—you'll likely want to use the same key in Outlook. Kleopatra makes this easy with its import function, which you can access via File / Import.
Exporting Keys: Secure Your Public and Private Keys for Email Encryption
In Kleopatra, you can export two key files: one containing your public
key and one with your private key. Select your email address from the
list. (If you have just installed everything, there should only be one
entry.) Then go to File / Export and add -public to the suggested file
name. This creates a file in the format DC0B6...-public.asc, which
contains a readable text version of the public key. If you're curious,
open this file in a text editor. At the beginning and end, you will see
these lines:
-----BEGIN PGP PUBLIC KEY BLOCK-----
[...]
-----END PGP PUBLIC KEY BLOCK-----
In between lies an ASCII-encoded form of the key.
To export the private key, go to File / Export Secret Keys and add
-private to the file name. At this step, you will need to enter your
passphrase. The exported version of the private key is also protected by
the passphrase; entering it here is necessary because Kleopatra encrypts
the export differently for compatibility reasons. The private key file
(e.g., DC0B6...-private.asc) also contains a readable version of the key:
-----BEGIN PGP PRIVATE KEY BLOCK-----
[...]
-----END PGP PRIVATE KEY BLOCK-----
Tip: You will also manage keys from your contacts—these will always be their public keys. Just as you keep your private key secret, your contacts will never share their own private keys.
Public vs. Private Key: Which One You Need for Gpg4win
- If you want to encrypt an email so that only the recipient can read it, you need the recipient's public key.
- If you want to sign an email so that the recipient can verify it really came from you, you need your own private key (along with your passphrase).
- If you want to encrypt and sign an email, you need both keys (and your passphrase for the signature).
Getting in Touch: Sharing and Receiving Public Keys
Send the public part of your key pair (the file with the -public.asc
extension) via email to contacts from whom you want to receive encrypted
emails, or publish the key on your website.
Note: Key exchange is easier if you upload your public key to a key server or use a Web Key Directory (WKD) in combination with a Web Key Service (WKS). However, this requires some setup—we will cover this topic in a separate blog post.
If you want to send your first encrypted and/or signed email to a contact who also uses GnuPG, follow these steps:
- If you already have your contact's public key, import it into Kleopatra via File / Import. Once imported, the contact will appear in the certificate list.
- If you don't have the public key, you can search for it on a key server. Go to File / Lookup on Server, enter the email address or name of your contact in the Search field, and if a match is found, select it and click Import.
Tip: If neither method works, send your contact one last unencrypted email and ask for their public key. You only need to import a contact's key in Kleopatra once.
Outlook: Signing and Encrypting Emails with Gpg4win
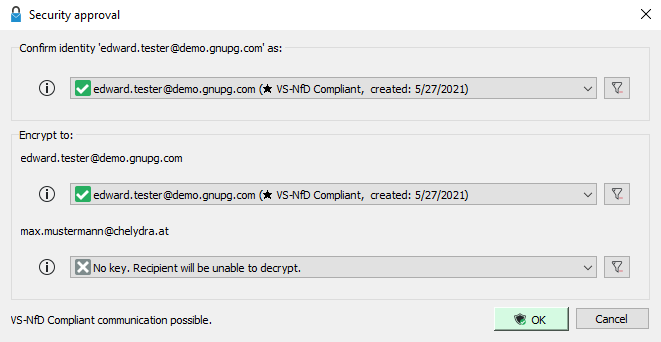
Figure 3: The Security Approval Dialog
Composing an email in Outlook works the same way as usual. However, before sending, click the new Secure button in the ribbon. The button will change appearance (darkened) to indicate that you have activated encryption or signing. When you hit Send, the Security approval dialog appears. The top section displays the identity used to sign and send the email. The bottom section lists all recipients and the corresponding keys used for encryption. If you see a gray X and the message No key. Recipient will be unable to decrypt., it means the recipient's public key is missing.
Confirm the details in this dialog by clicking OK, or cancel the process if any keys are missing—you can only fix this in Kleopatra. For signing, the Outlook add-in will now prompt you for your passphrase, after which Outlook will send the encrypted and signed email.
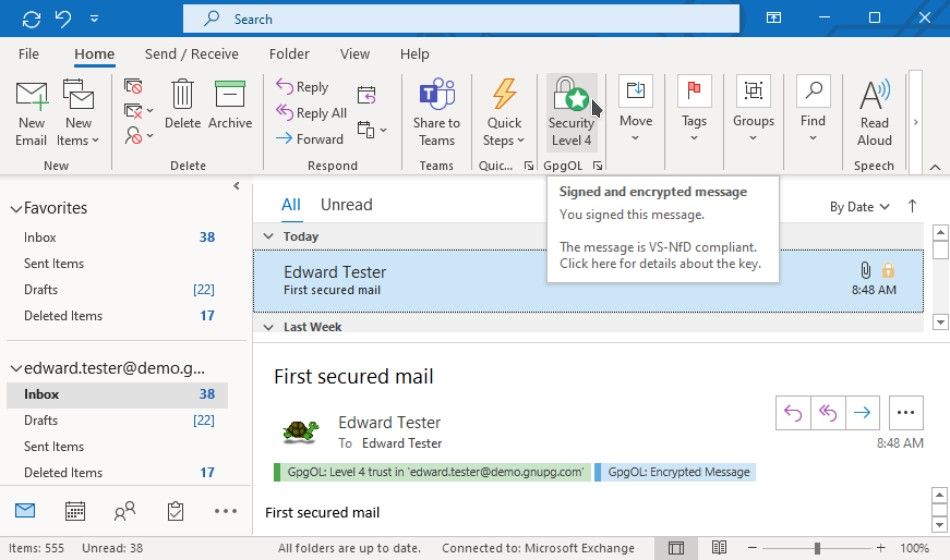
Figure 4: Receiving Encrypted/Signed Emails
If you receive a reply or a brand-new message, it may also be encrypted and/or signed. You can easily check this in Outlook:
- Encrypted emails display a blue notification under the sender's address: GpgOL: Encrypted Message.
- The Outlook ribbon also features a new icon added by the GpgOL add-in. Depending on the selected message, you'll see either a question mark with the text Insecure, or a lock icon with the text Encrypted. Hover over this icon (without clicking) to see security details. Ideally, it should say Signed and Encrypted Message.
Note: Outlook may sometimes flag the sender's address as untrusted. What this means and how to get rid of these warnings will be covered in a future blog post.
One-Time Setup for Long-Term Email Security with Gpg4win
The steps described in this article might seem complicated at first—but remember, you only need to do this once. You won't have to touch your key pair again until it expires, and for each contact you want to send encrypted emails to, you only need to import their public key a single time.
After that, the Outlook add-in handles everything else. You can even eliminate the need to click Secure manually by adjusting the GpgOL configuration and enabling the options Sign new messages by default and Encrypt new messages by default.
If you're now thinking about hundreds or even thousands of employees or other contacts and wondering how to manage key exchange in large organizations—don't worry. There are automated solutions, which we will introduce in our next article. Encrypted emails will then feel no different from unsigned or unencrypted ones.